
Know how to enable/ disable online archive in office 365 mailbox
Quick way to Enable / Disable Office 365 Mailbox Online Archiving Option
Enable Disable Exchange Online Mailbox Archiving
Are you seeking a way to enable or disable online archive in Office 365 suite? Do you need a simple and reliable solution? Do not worry, you are landed in the correct place. In this blog, step-by-step method is discussed to let users understand how to enable/ disable archive mailbox in Exchange online using EAC or PowerShell. Try Office 365 Mailbox Backup and Restore Software to archive Exchange Online emails and other items and save it on your local system. Before that, let us discuss brief information for the same."
The popularity of web-based services like Exchange online is increasing day after day. Moreover, Exchange Online is the cloud service created by Microsoft that allows moving a mailbox to it. If you are working on Exchange and searching for several ways to archive emails in Office 365 account. Thus, you need to disable archive mailbox option in the Exchange Server. In this blog, we are going to discuss a complete solution to enable or disable an archive mailbox in Exchange Online. The very first method is using Exchange Admin Center and the other one is using PowerShell commands. In the beginning, gather more knowledge about mailbox archive option in Exchange online.
Quick Glance on Archiving Mailbox in Office 365
Mailbox archiving option can be used by Exchange users to gain extra storage space. This is also called as ‘In-Place Archiving’. By default, this feature is disabled for all the Exchange online users. Before enabling archiving, users have to consider the maximum storage limit for ‘Exchange Online Plan 1’ if it is 50 GB, although ‘Exchange Online Plan 2’ users do not have the restrictions. Now, let us explore methods that will help to enable or disable archive mailboxes in Exchange Online.
Manual Way to Enable/ Disable Archive Mailbox in Exchange Online
Go through the following steps that will help to enable or disable an archive mailbox using Exchange Admin Center (EAC) and PowerShell command. Let us have a look:
1. Enable an Archive Mailbox in Exchange Online
A) Using Exchange Admin Center (EAC)
-->First, sign in to your Office 365 profile and click on app launcher icon and, then choose Admin.
-->Go to Admin centers from the bottom navigation of Office 365 admin center, and select Exchange option
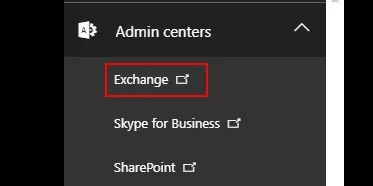
Click On Exchange within Admin Center
-->Under Exchange Admin Center, you can select the Recipients and then, choose Mailboxes. Then, choose a required mailbox that you wish to archive and choose enable option under In-Place Archive
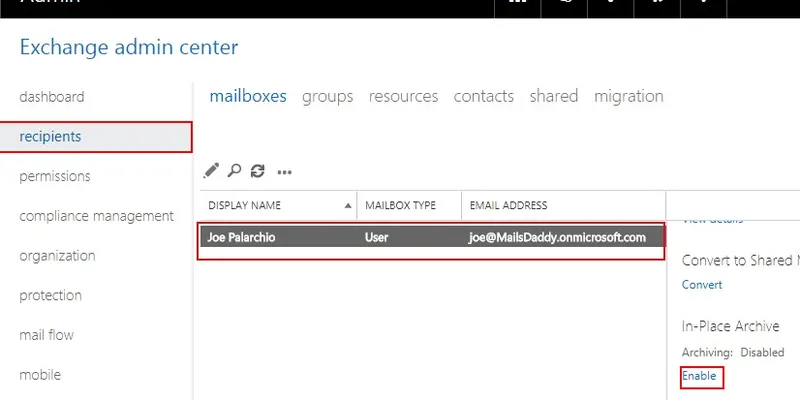
In Recipients click on Enable In-place archive
Note: Additionally, you can perform bulk archives to select multiple mailboxes. You can use Shift + Ctrl key together in order to select all mailboxes. After this, click on More options from the details panel. Then, choose Enable option under Archive.
B) Using Powershell Command
At first, you must have to connect your Exchange Online with Windows PowerShell. Now, run the following command:

Run Enable Mailbox Identity Command
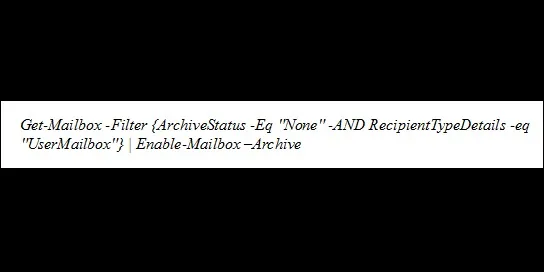
This example will enable an archive for Dominic Palarchio’s mailbox. Still, if you want to enable all the archive mailboxes in your organization, then run the below cmdlet.
2. Disable Archive Mailboxes in Exchange Online (O365)
A) By using Exchange Admin Center (EAC)
-->Sign in to your MS Office 365 account and go to app launcher icon and, then press Admin
-->In the lower-left navigation of Office 365 admin center, select the Admin centers and choose Exchange option
-->Under an EAC, choose the Recipients and then, Mailboxes. After that, choose a specific mailbox that you need to archive and click on enable option under the In-Place Archive
Note: Besides, you can perform bulk archives choosing multiple mailboxes. You can press Shift and Ctrl keys to select different mailboxes. Then, go to More options in the details panel and click Enable button under Archive.
B) Using Windows PowerShell Cmdlet
You can run the following script once you connect Office 365 organization with PowerShell.

Run Command Disable Mailbox as shown above
Bottom Line
In this blog, we have discussed two techniques to enable or disable an archive mailbox in Exchange Online. The first one is using Exchange Admin Center (EAC) and another solution is Windows PowerShell Commands. Thereby, you can prefer any one solution as per your convenience. Make sure you have to follow every step very carefully.


